martedì 15 dicembre 2015

Real-World Scale in 3DS Max

In questo breve tutorial vedremo come si utilizza il sistema Real-World Scale all'interno di 3DS Max.
Prima dell'introduzione di questo sistema, le mappe venivano dimensionate "ad occhio", con i problemi che ne derivano.
Real-World Scale invece realizza una corrispondenza reale tra le textures che utilizziamo per costruire i materiali e la scena modellata.

In this short tutorial we will see how using the system Real-World Scale in 3DS Max.
Before the introduction of this system, the maps were sized "eye", with resulting problems.
Real-World Scale instead creates a real correspondence between the textures that we use to build the material and the scene modeled.


Lavoriamo su questa scena:
We work on this scene:


Prepariamo un materiale, scegliendo uno slot disponibile e carichiamo un materiale di tipo Arch & Design (è quello di default).
Preparing a material by choosing an available slot and load a type material Arch & Design (is the default).


Prima di cominciare, ho già trovato le mappe che voglio utilizzare per il mio materiale. Queste le ho trovate su www.arroway-textures.ch e sono textures in bassa definizione, quindi inadatte per un render finale. Per gli scopi di questo tutorial, tuttavia, vanno bene lo stesso.

Before beginning, I found the maps that I want to use my material. I found these on www.arroway-textures.ch and textures are low resolution, so unsuitable for a final rendering. For the purposes of this tutorial, however, they are fine.

La prima a sinistra è la textures a colori, da caricare sul canale Diffuse. Quella al centro è per il canale Bump, quella a destra per il canale Glossiness (Reflection).

The first left is the texture color, to upload to the Diffuse channel. One in the center is for the Bump channel, the right channel Glossiness (Reflection).


Nel momento in cui carichiamo la prima mappa sul canale Diffuse, veniamo "dirottati" all'interno della finestra dei settaggi del canale Diffuse. Clicchiamo su View Image per vedere la mappa che abbiamo appena caricato.

The moment you load the first map on the Diffuse channel, we are "hijacked" in the settings window of the Diffuse channel. Click on View Image to see the map that we have just loaded.


Da questa finestra, è necessario capire che porzione di realtà stiamo vedendo.
Io immagino di stare vedendo un pavimento. Si tratta di 30 listelli di parquet. Se ogni listello misura 12 cm., allora sto vedendo una porzione di pavimento di 3,60 m. x 3,60 m. (l'immagine è quadrata, quindi è sufficiente stimare solo uno dei lati per ottenere l'altro).

From this window, you need to understand that portion of reality we are seeing.
I imagine that you are seeing a floor. It is 30 strips of parquet. If each strip measures 12 cm., Then I'm seeing a portion of the floor of 3,60 m. x 3.60 m. (the image is square, so it is enough to estimate only one side for the other).


Vado quindi a regolare i parametri di Size scrivendo il valore che ho appena ottenuto. Devo anche assicurarmi che l'opzione Use Real-World Scale sia attivata.

I go then to adjust the parameters of Size writing the value that I just got. I also have to make sure that the Use Real-World Scale is turned on.


Il procedimento è esattamente lo stesso con le altre due mappe. E' sufficiente aver stimato il valore Size del Diffuse per applicarlo anche agli altri canali (in quanto le mappe di partenza hanno le stesse dimensioni).

The process is exactly the same with the other two maps. it is sufficient to have estimated the value of Size Diffuse to apply it to other channels (as the maps departure are the same size).

Applico il materiale al plane che rappresenta il pavimento della scena ed eseguo un render. Il pavimento, ora,  è rappresentato dai listoni del parquet, congruamente dimensionati rispetto alla scena.
Il fatto che non si distingua bene è dovuto all'utilizzo di textures di bassa qualità (sono textures demo in download gratuito). Con textures di qualità adeguata si ottengono risultati veramente spettacolari.

Apply the material to the plan which is the floor of the stage and execute a render. The floor now is represented by strips of parquet, suitably sized according to the scene.
The fact that it does not really stand well is due to the use of low quality textures (textures are demo for free download). With textures of adequate quality you get results really spectacular.


Ecco un'altra vista per cercare di apprezzare meglio l'effetto.
Here is another view to trying to better appreciate the effect.


Se questo tutorial ti è piaciuto clicca su uno qualsiasi degli ads nella pagina oppure - ancora meglio - clicca sul pulsante in basso per utilizzare Paypal e fare una donazione da € 1,00. Grazie.
If you liked this tutorial click on any of the ads on the page or - better yet - click on the button below to use Paypal and make a donation of € 1.00. Thank you.


lunedì 14 dicembre 2015

MENTAL RAY: Utilizzare il Daylight system

In questo tutorial vedremo come inserire nella scena il sistema Daylight, che simula un'illuminazione solare.
In this tutorial we will see how to enter the scene the Daylight system, which simulates solar illumination.

Ho modellato una semplice scena che simula un ambiente esterno con alcuni manufatti.
Scelgo la vista e ne creo la telecamera corrispondente (Ctrl + C).
I modeled a simple scene that simulates an outdoor environment with some artifacts.
I choose the view and I create the corresponding camera (Ctrl + C).


Mi metto in una vista top e mi preparo per inserire il Daylight System.
I put myself in a top view and get ready to enter the Daylight System.


Il Daylight non è una semplice luce: è invece una serie di elementi raggruppati a formare un sistema autonomo perfettamente integrato e basato su dati illuminotecnici fisicamente accurati. Questi elementi sono tre:
1 - una luce che simula il sole;
2 - un sistema di orientamento (bussola, rosa dei venti);
3 - l'illuminazione diffusa della volta celeste ("cielo").

The Daylight is not just a light: it is instead a series of items grouped to form an autonomous system fully integrated and based on data physically accurate lighting. These elements are three:
1 - a light that simulates the sun;
2 - a system of orientation (compass, wind rose);
3 - the diffuse illumination of the sky ("sky").

Nel pannello "Systems", ultima icona a destra, scegliamo lo strumento Daylight.
In the "Systems", last icon on the right, choose the instrument Daylight.


Bisogna cliccare, tenere cliccato il tasto sinistro del mouse e muoverlo per creare il Compass (la bussola); fatela grande quanto basta per vederla poi rilasciate il tasto del mouse. Muovetelo in verticale fino al bordo dell'area di lavoro poi fate clic con il tasto sinistro per creare il Sun.

You need to click, keep clicking the left mouse button and move it to create the Compass; let it just big enough to see it, then release the mouse button. Move it vertically to the edge of the work area then click the left button to create the Sun.

Se è la prima luce che create, apparirà il messaggio:
If it is the first light that created, the message:


3DS sta avvertendo che è consigliabile utilizzare d'ora in poi il sistema mr Photographic Exposure Control per controllare l'illuminazione globale della scena.
Cliccate Yes per confermare.

3DS is warning that you should use, from now on, the system mr Photographic Exposure Control to control global illumination of the scene.
Click Yes to confirm.

Subito dopo appare un altro messaggio. 3DS sta chiedendo se vogliamo aggiungere l'elemento "cielo" alla nostra scena. Il nome ufficiale è mr Physical Sky.
Cliccate Yes per confermare.

Soon after, another message. 3DS is asking if we add the sky to our scene. The official name is mr Physical Sky.
Click Yes to confirm.


Abbiamo così un nuovo elemento in scena: il Sun con il Compass, al quale è legato. Come abbiamo detto, insieme al mr Physical Sky formano il Daylight System.
We have thus a new element in the scene: the Sun with the Compass, which is tied. As we have said, with the mr Physical Sky, form the Daylight System.


Cominciamo subito a modificare i parametri del Daylight.
La prima cosa è aumentare il valore di Orbital Scale per allontanare il Sun dal centro della scena. Questo non influisce sulla quantità di luce, è solo un modo pratico per spostare dalla scena un elemento che rischia di essere "ingombrante".

We begin now to change the parameters of the Daylight.
The first thing is to increase the value of Orbital Scale to remove the Sun from the center of the scene. This does not affect the amount of light, it's just a practical way to move from the scene of an element that is likely to be "cumbersome".


In secondo luogo, utilizziamo il valore North Direction per orientare correttamente il Compass rispetto alla scena modellata.

Second, we use the value North Direction to properly orient the Compass compared to the scene modeled.


Possiamo procedere scegliendo una località specifica cliccando su Get Location.
We can proceed by choosing a specific location by clicking on Get Location.


Dalla finestra successiva scegliamo la località in cui stiamo operando. Nell'esempio, ho scelto Roma ma, togliendo la spunta dall'opzione Nearest Big City, possiamo cliccare liberamente qualsiasi punto sulla mappa.

From the next window we choose the location in which we are operating. In the example, I chose Rome but, by removing the check from the Nearest Big City, you can click anywhere on the map freely.


Infine, scegliete un giorno, un mese e l'orario.
Finally, choose a day, month and time.


Man mano che modificate i valori, vedrete il Sun muoversi nella scena, adeguandosi alla vostre scelte.
Per questo tutorial, ho scelto di operare a Roma, il giorno 13 settembre 2015, alle ore 11.

As you change the values, you will see the Sun moving in the scene, adapting to your choices.
For this tutorial, I chose to work in Rome, on September 13, 2015, at 11 am.


Assegnamo a tutti gli oggetti in scena un unico materiale, un Arch & Design grigio neutro.
Assigned to all objects in the scene from a single material, an Arch & Design neutral gray.


Poi eseguiamo un render di prova.
Then run a test render.


E' già molto buono, l'illuminazione è molto convincente e il cielo è coerente con il luogo, il giorno, il mese e l'ora.
Nel pannello agganciato alla finestra di render, portiamo il valore FG Bounces a 5.

Is already very good, the lighting is very convincing, and the sky is consistent with the place, day, month and time.
Panel attached to the render window, we bring the value FG Bounces 5.


Poi andiamo nel menu Rendering --> Exposure Conrol.
Vediamo che il sistema, automaticamente, ha caricato il mr Physical Sky nella casella del Background e il mr Photographic Exposure Control come algoritmo di calcolo dell'illuminazione.
Cliccate su Render Preview; poi, più sotto, modificate il valore di Exposure Value (EV) finnchè l'illuminazione della scena vi soddisfa.
Per approfondire l'argomento Exposure Control leggi questo post.

Then we go to the Render menu -> Exposure Control.
We see that the system automatically loaded the mr Physical Sky box in the background and the mr Photographic Exposure Control as calculation algorithm lighting.
Click Render Preview; Then, below, change the value of the Exposure Value (EV) as long as the lighting of the scene you are satisfied.
To deepen Exposure Control you read this post.


Bisogna infatti ricordare che il sistema è fisicamente corretto ma la scena viene visualizzata attraverso una telecamera di cui possiamo cambiare i parametri. Il fattore EV deriva dalla velocità dello scatto della nostra macchina fotografica virtuale (Shutter Speed), dall'apertura del diaframma (Aperture) e dalla sensibilità della pellicola (Film Speed).

It must be remembered that the system is physically correct but the scene is displayed through a camera of which we can change the parameters. Factor EV comes from shooting speed of our virtual camera (Shutter Speed), by the aperture (Aperture) and the sensitivity of the film (Film Speed).

Con un valore di EV pari a 14,5 ho ottenuto questo risultato (la componente azzurra dell'immagine è dovuta al contributo del mr Physical Sky):

With a value equal to 14.5 EV I achieved this (the blue component of the image is due to the contribution of mr Physical Sky):


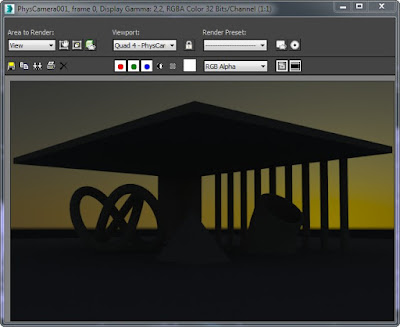
E adesso una serie di render eseguiti modificando solo l'orario.
And now a number of render performed by changing only the time.

Ore 7:00

Ore 9:00
Ore 11:00
Ore 13:00
Ore 15:00
Ore 17:00
Ore 19:00
Risulta quindi evidente che, quando si cambia l'orario nel pannello del Sun, tutto il Daylight System viene modificato di conseguenza: il sole si sposta sia sullo zenith che sull'azimuth e il cielo assume colori e intensità adeguati al momento.

It is therefore clear that, when you change the time on the panel of the Sun, around the Daylight System is modified accordingly: the sun moves on both the zenith that sull'azimuth and the sky takes on color and intensity appropriate to the moment.


Se questo tutorial ti è piaciuto clicca su uno qualsiasi degli ads nella pagina oppure - ancora meglio - clicca sul pulsante in basso per utilizzare Paypal e fare una donazione da € 1,00. Grazie.

If you liked this tutorial click on any of the ads on the page or - better yet - click on the button below to use Paypal and make a donation of € 1.00. Thank you.