Visualizzazione post con etichetta parquet. Mostra tutti i post

mercoledì 16 novembre 2016

V-RAY MATERIAL: PARQUET


Creiamo un parquet utilizzando il materiale V-Ray Material.
Utilizzeremo solo 3 canali: Diffuse, Reflection e Bump.
Apriamo il Material Editor e inseriamo un materiale VRayMtl.
Se non l'hai ancora fatto, leggi ora il tutorial sulle caratteristiche dei materiali V-Ray.
We create a parquet using the V-Ray Material.
We will use only 3 channels: Diffuse, Reflection and Bump.
Open the Material Editor and insert a VRayMtl material.
If you have not already done so, read the tutorial now on the features of V-Ray materials.


La scena è molto semplice, per mantenere i tempi di render al minimo.
A tutti gli oggetti in scena è stato assegnato uno stesso VRayMtl di colore grigio medio, per bilanciare correttamente le luci.
-> Bilanciamento delle luci (in preparazione)
The scene is very simple, to keep the render times to a minimum.
To all the objects in the scene it has been assigned the same medium gray VRayMtl to properly balance the lights.
-> Lights Balance (in preparation)


DIFFUSE

Inserisco la seguente mappa sul canale Diffuse del mio materiale Parquet.
I enter the following map on the Diffuse channel of my Flooring material.


Nel pannello di dettaglio del canale Diffuse, utilizzo il sistema Real-World Scale per dimensionare la mappa.
Non sai utilizzare il Real-World Scale? Segui questo tutorial
In the panel of detail of the Diffuse channel, use the Real-World Scale system to scale the map.
You do not know to use the Real-World Scale? Follow this tutorial


REFLECTION

Un parquet ha sempre una certa quantità di riflessione. Nel pannello relativo, quindi, clicchiamo sul selettore del colore.
A parquet always has a certain amount of reflection. In its panel, click on the color picker.


Per cominciare, scelgo un grigio medio. I sistemi Red-Green-Blue e Hue-Sat-Value sono alternativi tra loro. Potete lavorare indifferentemente su uno o sull'altro per trovare il colore che cercate.
In questo caso, però, non stiamo cercando davvero un colore quanto piuttosto un valore di riflessione.
L'unico parametro che ci interessa è il Value. Il Value regola la quantità di riflessione: quanto più è vicino al bianco, quanto più il materiale rifletterà.
Scegliamo Value=128, per adesso.
Verificate che il parametro Fresnel sia attivato
To begin, choose a medium gray. The Red-Green-Blue and Hue-Sat-Value systems are alternatives to each other. You can work indifferently on one or the other to find the color you want.
In this case, however, we are not trying really one color but rather a reflection value.
The only parameter that interests us is the Value. The Value adjusts the amount of reflection: the more it is close to white, the more the material will reflect.
We choose Value = 128, for the time being.
Check that the Fresnel parameter is activated.


Ora eseguiamo un primo render di prova.
Now we perform a first test render.


Possiamo migliorare la distribuzione della riflessione utilizzando la stessa texture che abbiamo usato nel Diffuse, questa volta in scala di grigi. Il concetto è sempre quello: le parti dell'immagine che si avvicinano al bianco rifletteranno molto, quelle che si avvicinano al nero rifletteranno poco o niente.
We can improve the distribution of the reflection using the same texture we used in Diffuse, this time in grayscale. The concept is the same: the parts of the image that are closer to white will reflect a lot, those that are closer to black will reflect little or nothing.


Cliccate sulla casellina di fianco al selettore del colore e caricate la texture in scala di grigi.
Click on the box next to the color picker and load the textures in greyscale.


Possiamo ora dare una sfuocatura alla riflessione utilizzando il parametro RGlossiness. Per valori inferiori ad 1 la sfuocatura aumenta progressivamente.
We can now give a blur to the reflection using the RGlossiness parameter. For values less than 1, the blur gradually increases.


Facciamo un altro render di prova. Nella zona evidenziata si vede l'effetto della riflessione, molto credibile.
Let's do a test render. In the highlighted area we see the effect of reflection, very credible.


BUMP

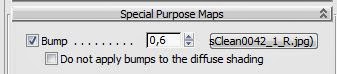
Ora carichiamo nel canale Bump un'altra texture, uguale alle altre, in scala di grigi. In questa, rispetto alle altre, abbiamo aumentato il contrasto tra zone chiare e scure.
Now we load another texture in the Bump channel, like the others, in grayscale. This, compared to the other, we have increased the contrast between light and dark areas.


Regoliamo il valore del Bump facendo diversi tentativi.
We set the value of the Bump making several attempts.


Render finale.
Final render.


Eseguo il render abbassando la camera e la rilessione aumenta. E' l'effetto del parametro Fresnel.
Do you render lowering the camera and the reflection increases. It is the effect of the Fresnel parameter.


Altri link sui materiali V-Ray:
--> Parametri generali dei materiali V-Ray (VRayMtl) / General parameters of V-Ray materials (VRayMtl)
--> Specchio con V-Ray Material  / Mirror with V-Ray Material
--> Metalli con V-Ray Material / Metals with V-Ray Material
--> Vetro con V-Ray Material / Glass with V-Ray Material


Se questo tutorial ti è piaciuto clicca su uno qualsiasi degli ads nella pagina oppure - ancora meglio - clicca sul pulsante in basso per utilizzare Paypal e fare una donazione da € 1,00. Grazie.
If you liked this tutorial click on any of the ads on the page or - better yet - click on the button below to use Paypal and make a donation of € 1.00. Thank you.

domenica 28 ottobre 2012

MENTAL RAY: Un parquet d'effetto con 3DS Max - Parquet with 3DS Max


Vediamo in questo tutorial come realizzare un materiale parquet con Mental Ray in pochi passaggi.
We see in this tutorial how to make a flooring material with Mental Ray in a few steps.

La scena - The scene

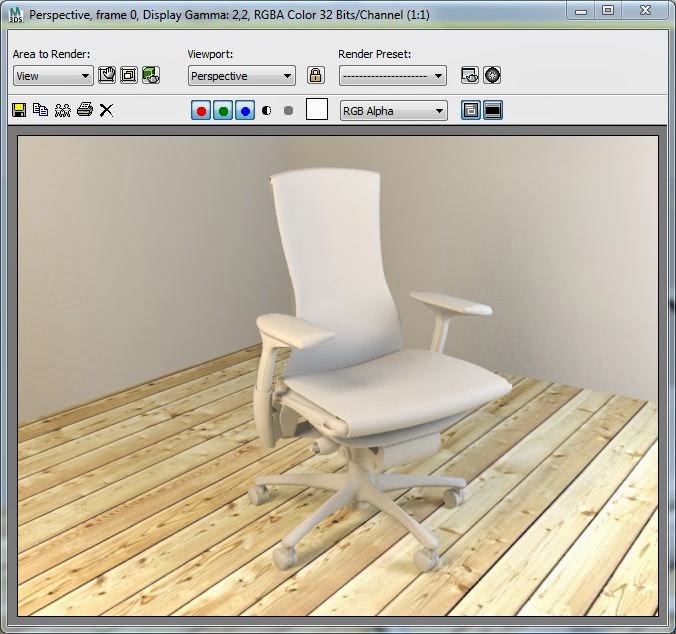
La scena è molto semplice: si tratta  del render di una poltroncina. Un piano simula il pavimento, due box fungono da pareti. Due luci ed una telecamera per completare la scena. A tutti gli oggetti è stato assegnato un unico materiale grigio chiaro.

The scene is very simple: it is the rendering of a chair. A plane simulates the floor, two boxes serve as walls. Two lights and a camera to complete the scene. All objects have been assigned a unique light gray material.

La scena
Render senza materiali (per la precisione, a tutti gli oggetti in scena è stato applicato uno stesso materiale di tipo Arch & Design grigio chiaro)
Render without materials (to be precise, to all objects in the scene you have applied the same type material Arch & Design light gray)

Diffuse

Cominciamo preparando il materiale parquet.
Su cgtextures.com ho trovato questa mappa che utilizzerò come partenza per il parquet.
Questa sarà la mappa che utilizzerò sul canale Diffuse.

Let's start preparing material parquet.
On cgtextures.com I found this map that I will use as a base for the parquet.
This will be the map that I will use the Diffuse channel.


Andiamo a caricare la mappa sul canale Diffuse, regoliamone la scala ed eventualmente la rotazione.
Facciamo un primo render.

We load the map on the Diffuse channel, we set the scale and possibly the rotation.
We make a first render.


Render (solo canale Diffuse)
Render (only Diffuse)
Cominciamo a lavorare sul materiale per migliorarlo.

Reflection

In natura, tutte le superfici riflettono la luce. Naturalmente per alcuni materiali la riflessione è più evidente che in altri. E' ovvio che un metallo cromato riflette molto di più di un muro di mattoni, a tal punto che per quest'ultimo possiamo tranquillamente trascurare questo effetto.
In generale, però, dovremmo porci il problema di quanto riflette il materiale che stiamo preparando.

In nature, all surfaces reflect light. Of course, for some materials the reflection is more obvious than in others. It 'obvious that a chromed metal reflects much more of a brick wall, to such an extent that the latter we can safely ignore this effect.
In general, however, we should ask ourselves the question of how the material reflects that we are preparing.


Un parquet è un materiale mediamente riflettente. Dovremo quindi agire anche sul canale della Reflection per dargli credibilità.
Un modo veloce per aggiungere riflessione ad un materiale è agire sul parametro Reflectivity dell'apposito canale Reflection.
Per l'esempio in oggetto, porto il valore a 0,8.

A parquet is a reflective material on average. We will have to act also on the channel of Reflection to give it credibility.
A quick way to add reflection to a material's use parameter Reflectivity in the canal Reflection.
For the example in question, I bring the value to 0.8.


Settaggi per la riflessione
Settings for reflection
La riflessione dipende anche dal parametro IOR; scegliamo quindi l'opzione IOR e settiamo il valore a 10, per esigenze relative a questo tutorial. Probabilmente però è un valore eccessivo.
Rifaccio il render.

The reflection also depends on parameter IOR; then choose the option IOR and we set the value to 10, for reasons related to this tutorial. But probably it is an excessive value.
Make my render.


Render (canale Diffuse con mappa + Reflection)
Render (Diffuse channel with map + Reflection)

Il risultato è già discreto ma possiamo migliorarlo. Nel render qui sopra il parquet riflette uniformemente, come se fosse appena stato lucidato.
In effetti, invece, il parquet rifletterà in maniera uniforme dove le venature sono poco presenti, mentre, in corrispondenza di queste ultime e dei nodi del legno, la riflessione non sarà presente.
Come si ottiene questo effetto? Partendo dalla mappa che ho utilizzato con Diffuse, con un programma di editing immagini trasformo l'immagine in scala di grigi, poi uso lo strumento Immagine->Livelli per regolare il contrasto.

The result is discreet but already we can improve it. In the render above the parquet it reflected evenly, as if it had just been polished.
In fact, however, the parquet will reflect in a uniform manner where the veins are less present, while, in correspondence of the latter and of the nodes of the wood, the reflection will not be present.
How do you get this effect? Starting from the map that I used with Diffuse, with an image editing program, I transform the image into grayscale, then use the tool Image> Layers to adjust the contrast.


Trasformazione della mappa a colori in scala di grigi; poi si regolano i Livelli per dare più contrasto
Transformation of the color map Grayscale; Then they adjust the levels to give more contrast

Ottengo una mappa di questo genere:
I get a map of this kind:

Mappa utilizzata sul canale Reflection
Map used on the canal Reflection


Questa mappa, caricata sul canale Reflection, farà in modo di riflettere molto in corrispondenza delle zone chiare dell'immagine e quasi nulla in corrispondenza delle zone scure.

This map, loaded on the channel Reflection, reflects much at the areas of the image brighter and almost nothing in correspondence of dark areas.


Rifaccio il render e ottengo un risultato molto migliore, in quanto le fughe del parquet ed i nodi non riflettono.

I make my render and get a much better result, as the joints of the parquet and the nodes do not reflect.

Render (canale Diffuse con mappa + Reflection con mappa)


Glossiness

Il Glossiness regola il grado di lucentezza della riflessione. Valori uguali a 1 forniscono una riflessione netta, a specchio. Valori inferiori sfocano progressivamente la riflessione rendendola molto più realistica per un parquet. proviamo a settare un valore di 0,5.

The Glossiness controls the gloss level of reflection. Values equal to 1 provide a net reflection, like a mirror. Values less blur progressively reflection making it much more realistic for a parquet. I try to set a value of 0.5.

Regolazione del valore di Glossiness

Rifaccio il render e il risultato migliora ulteriormente. 
Make my render and the result is further improved.

Render (canale Diffuse con mappa + Reflection con mappa + Glossiness)

Il valore Glossy Samples è la qualità della sfocatura. In genere, una valore di 8 è già sufficiente.
Glossy Samples value is the quality of the blur. Typically, a value of 8 is already sufficient.


Bump

Non ci resta che dare la pennellata finale. Dobbiamo aggiungere rugosità al parquet, in corrispondenza delle venature del legno.
Utilizziamo la stessa mappa preparata per la Reflection, aggiungendola al canale Bump.

We just have to give the final stroke. We need to add roughness to the parquet, in correspondence of the wood grain.
We use the same map prepared for the Reflection, adding it to the channel Bump.


Faccio il render finale:
I do the final rendering:

Render (canale Diffuse con mappa + Reflection con mappa + Glossiness + Bump)


Una cosa importante da ricordare è che tutte le mappe che ho utilizzato derivano da un'unica mappa iniziale.
Per far sì che le fughe e le irregolarità (le venature) coincidano, dovrò stare attento a settare su tutti i canali utilizzati gli stessi valori di scala e di rotazione.

One important thing to remember is that all of the maps that I used are derived from a single initial map.
To ensure that the joints and irregularities (veins) match, I will have to be careful to set all channels used the same values of scale and rotation.


Regolazioni di Size e Angle per il canale Diffuse. Tali valori sono da rispettare anche sugli altri canali che caricano una mappa, e cioè Reflection e Bump


Se questo tutorial ti è piaciuto clicca su uno qualsiasi degli ads nella pagina oppure - ancora meglio - clicca sul pulsante in basso per utilizzare Paypal e fare una donazione da € 1,00. Grazie.

If you liked this tutorial click on any of the ads on the page or - better yet - click on the button below to use Paypal and make a donation of € 1.00. Thank you.